I hope everyone had a good holiday! Since I’ve been asked how I did this, and also got some people who didn’t quite believe this was a painting, I’m going to show you the steps if you’d like to learn how I go about my painting process. All of my painting is done in Photoshop with the basic round hard and soft brushes. This is a longish one, so stick around if you’re interested. You’ll have to zoom into the image pretty far to be able to see each individual step.
1.) Typically I would start with a super basic sketch, but in this case since I didn’t record that step and the sketch turned out to be hideously ugly anyway, I skipped it! The sketch is usually very, very, VERY basic. It’s not fully defined at all, but instead I try to best lay out where certain landmarks are. Like where is the jawline, where are the eyes, where are the shoulders, etc etc etc. Black marks on a white background. I’ll then turn this sketch layer down in opacity to paint under it.
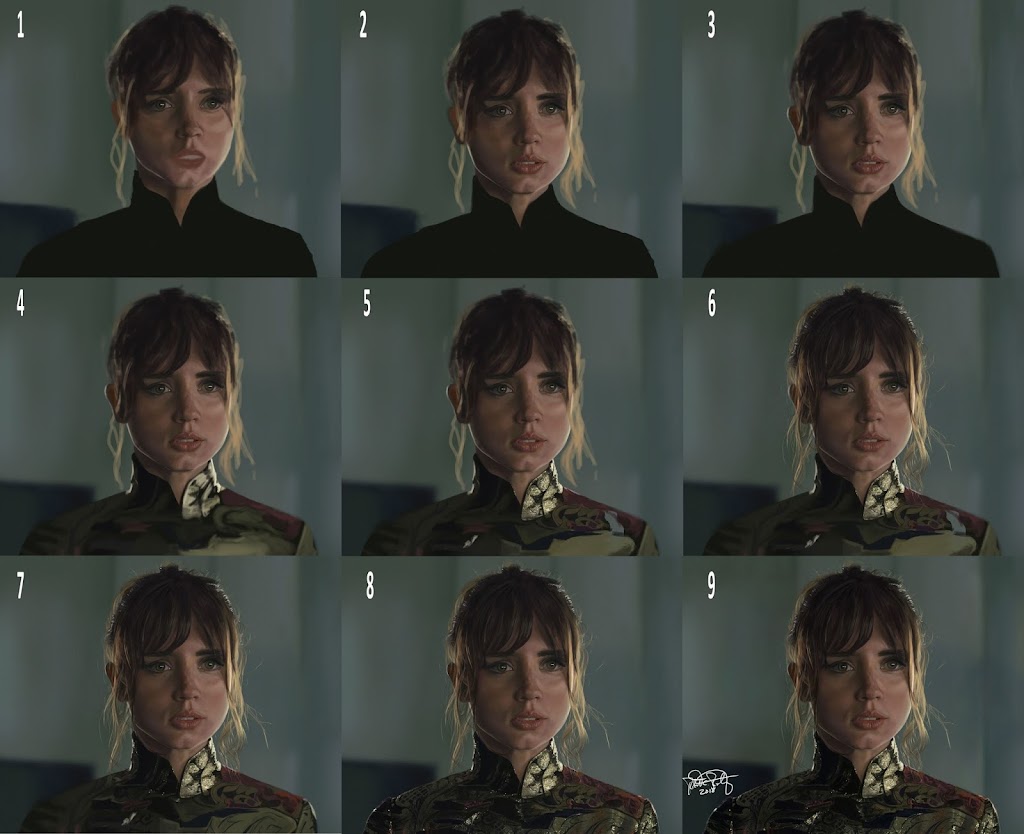
You can see in the first image I’m starting to lay out the flats of the image, that is to say first I lay down a “flat” color…just something that gives me something to paint over as a starting point, done with a hard round brush with pen pressure turned off; just basic shapes and colors. I then start fleshing in more of the light and shadows (still very basic) with a hard brush, pen pressure turned on. Also, in my portrait images I tend to always start detailing the eyes above all else. Why? I believe that the soul and essence of a portrait is laid within the eyes, and hence are the most important part of the painting that can give personality. This, to me, is particularly the case with Ana de Armas. And for me, in this case, it’s a natural jumping off point, and helps me engage with the rest of the image.
I laid out the background as well, just using a big ole soft round brush with pen pressure turned on to get the gist of everything that’s going on. For me it’s best to have something there just to give some early “cohesiveness” to the image.
2.) I start to render out more details of the face, paying more attention to the lighting and color schemes. I’m still not going into great detail, but just getting the basic lighting and shadows laid out. Using a soft, round brush with this, at 100% opacity with pen pressure on. You can see that the lips are better defined, chin has better shape, and the overall sense of lighting is there.
3.) Even more detail with the face. When detailing and blending at this point, I drop the brush opacity down to 10-30% so I can achieve smoother blends. Depending on the area I may also use the smudge tool at 5-20%
4.) I continue to work out rendering the face, and start to block in basic colors and shapes into the dress. The dress turned out to be a pretty massive undertaking in its complexity and texture in order to give it that realistic look and feel.
5.) Detailing begins on the dress starting with the shinier sequins near the top. I mostly used a soft round brush to develop the sequins, using the dodge tool to really bring out how shiny certain aspects of them were. The dodge tool is awesome for this, but you have to be careful to not overdo it. It can really blow out your values very easily if you let it. I’ll tend to skip around the painting a bit to alleviate boredom from just painting one area. The face is basically done at this point, but I do touch ups depending on the area…like the ear, which I do when I get to doing the hair.
You’ll see I’m still figuring out the layout for the dress…it’s just complex, so I move one whole section over to the left, exposing the background!
6.) Painting the details of the hair! Using a soft, round brush set to 100% opacity with shape dynamics turned to pen pressure (to get that nice thick to thin look). Additionally, I put a gaussian blur filter to the background as well as added noise. I made the background a smart object before adding the filters so I could more easily see their effects.
7.) Now that the hair is done, I work out even further details with the face, and begin to define more of the shapes of the dress. The dress is very ornate and took a bit of planning to get all of the shapes in order (hence the mishap that happened in step 5).
Ear got completed as well!
8.) Details of the dress done, whew! This took forever, but really happy with the results. Some portions, like the smaller details of the sequins were using a hard round brush, but this was mostly done using just a soft round brush. Again, using the dodge tool to bring out the shiny bits. I experimented with some textured brushes, but couldn’t achieve the look I was going for, so ultimately just ended up creating the textures myself using a round brush. Admittedly, I’m awful at using textured brushes, but I really couldn’t find one that I thought could do the job, and I even created some of my own.
9.) Levels adjustment to bring out some of the values a bit more. It was looking a bit hazy, so I used this to achieve a more realistic effect, despite it possibly crushing some of the blacks. A good trade-off I thought though. Also worked on finalizing the background. And I’m calling it done! Signed!
Thanks for reading! Let me know if anyone has any questions!